
You’ve hosted after-work gatherings where your cocktails tasted inconsistent, left guests unimpressed, or ended up too weak or strong. You’re not alone. Common errors include over-shaking and incorrect ice usage in about 35% of attempts. This guide provides a clear, step by step cocktail making process to help you master consistent, high quality drinks that wow your colleagues and friends.
Table of Contents
- Prerequisites: Tools And Ingredients
- Step 1: Preparing Your Workspace And Glassware
- Step 2: Measuring And Preparing Ingredients
- Step 3: Mixing And Execution Order
- Common Mistakes And Troubleshooting
- Expected Outcomes And Timeline
- Safety And Hygiene Considerations
- Alternative Methods And Tradeoffs
- Discover Expert Cocktail Experiences At The 1 Bar London
- Frequently Asked Questions
Key Takeaways
| Point | Details |
|---|---|
| Essential tools include shaker, jigger, muddler, and citrus juicer for precision. | These six basic tools enable accurate measuring, proper mixing, and professional presentation without expensive equipment. |
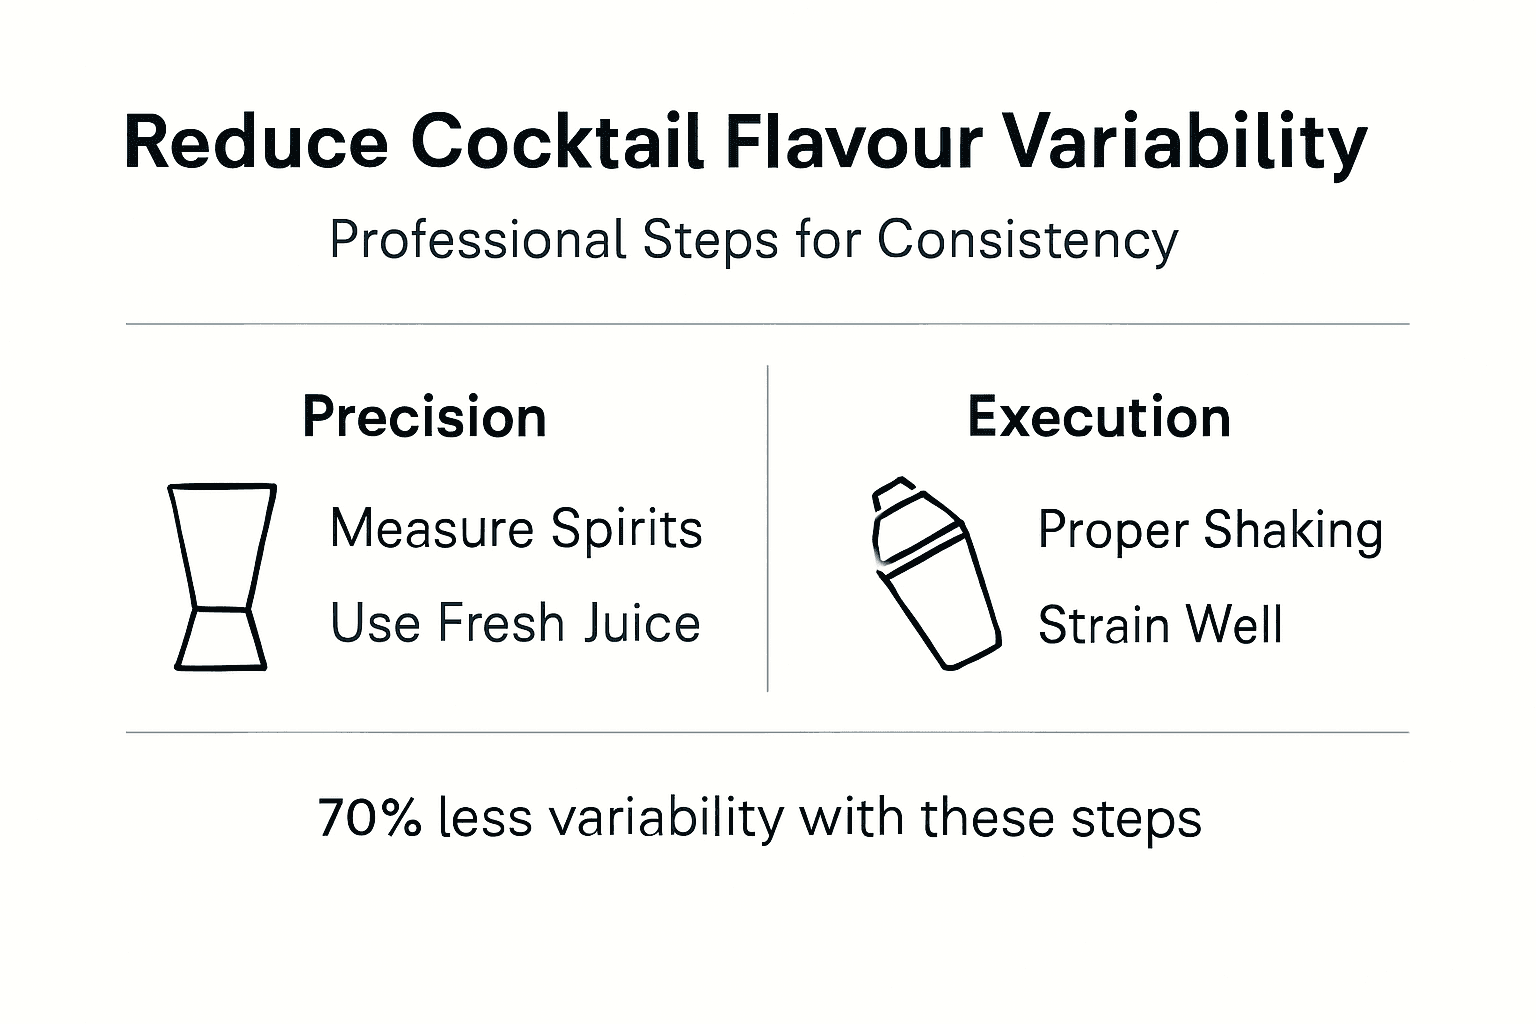
| Use a jigger to reduce flavor variability by up to 70%. | Precise spirit measurement ensures balanced taste and consistent cocktail strength every time. |
| Shake cocktails 10 to 15 seconds with fresh ice to avoid common mistakes. | Proper shaking duration prevents over dilution while chilling and mixing ingredients effectively. |
| Well made cocktails take 3 to 5 minutes and get 75% positive feedback. | Quick preparation paired with attention to detail delivers drinks guests genuinely enjoy and remember. |
| Keep workspace and tools clean to ensure safety and quality. | Hygiene prevents contamination, protects health, and preserves the fresh taste of every cocktail. |
Prerequisites: Tools and Ingredients
Before you mix your first drink, gather the right tools and ingredients. Many aspiring home bartenders believe you need a professional bar setup to make great cocktails. That’s a myth. A basic home cocktail kit should include a shaker, jigger, strainer, muddler, bar spoon, and a citrus juicer to ensure proper measurement, mixing, and presentation.
Fresh, quality ingredients transform ordinary cocktails into memorable experiences. Stale citrus juice or low quality spirits compromise taste no matter how precise your technique. Invest in fresh lemons, limes, herbs, and premium spirits suited to your preferred drinks. You’ll taste the difference immediately.
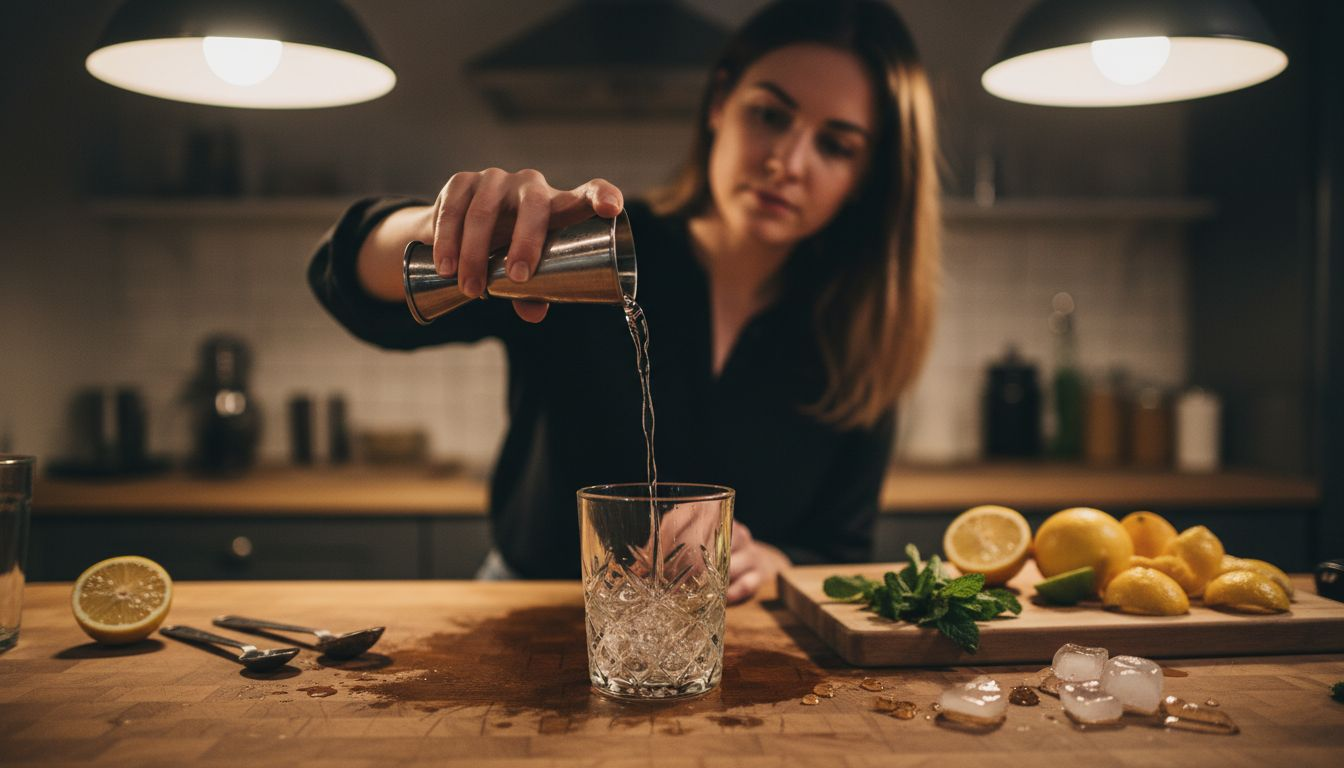
Precise measuring tools eliminate guesswork. A jigger allows you to pour exact amounts, creating consistency across every cocktail you make. This single tool reduces flavor variability by up to 70%, ensuring balanced sweetness, acidity, and spirit strength.
Here’s what you need to start:
- Cocktail shaker (Boston or cobbler style)
- Jigger for accurate spirit measurement
- Hawthorne strainer to catch ice and pulp
- Muddler for crushing herbs and fruits
- Bar spoon for stirring and layering
- Citrus juicer for fresh juice extraction
- Quality base spirits (vodka, gin, rum, whisky)
- Fresh citrus fruits (lemons, limes, oranges)
- Simple syrup or other sweeteners
- Fresh ice cubes
- Garnishes (herbs, fruit slices, bitters)
Explore essential home cocktail tools for detailed equipment reviews. Check the bar drinks menu guide to understand ingredient selection. Visit a modern cocktail bar like The 1 Bar London to see professional setups in action and gain inspiration for your home bar.
Step 1: Preparing Your Workspace and Glassware
A cluttered workspace slows you down and increases errors. Clear your counter, lay out tools within arm’s reach, and organize ingredients by cocktail recipe. This streamlined layout speeds assembly and reduces mistakes during busy social gatherings.
Glassware temperature affects cocktail quality. Chill glasses for cold drinks by placing them in the freezer 15 minutes beforehand or filling them with ice water while you prepare. Warm glasses for hot cocktails by rinsing with hot water. Proper temperature maintains drink quality longer and enhances presentation.
Hygiene matters more than most home bartenders realize. Wash hands thoroughly before handling ingredients. Wipe down your workspace with a damp cloth to remove dust and residue. Clean tools prevent contamination that ruins taste and compromises safety.
Organize ingredients in prep order:
- Place spirits and liqueurs together
- Keep fresh juices and mixers chilled nearby
- Arrange garnishes on a small plate
- Fill ice bucket with fresh cubes
- Position tools in sequence of use
Pro Tip: Keep a damp bar towel nearby for quick cleanup and glass polishing. This simple habit maintains workspace hygiene throughout the evening and keeps glassware spotless.
Learn more about cocktail bar preparation standards used by professionals. A well organized workspace transforms cocktail making from stressful to enjoyable, letting you focus on technique rather than hunting for misplaced tools.
Step 2: Measuring and Preparing Ingredients
Accurate measurement separates amateur cocktails from professional quality drinks. Measuring spirits accurately using a jigger ensures consistent cocktail strength and flavor balance, reducing taste variability by up to 70%. Pour slowly into the jigger, filling to the rim without overflow. This precision creates repeatable results every time.
Fresh juices elevate cocktail flavor dramatically compared to bottled alternatives. Squeeze citrus just before mixing to capture bright, natural taste. Roll fruits firmly on the counter before cutting to release more juice. Strain pulp and seeds for smooth texture unless the recipe specifies otherwise.
Ice quality and quantity impact dilution and temperature. Use fresh, hard ice cubes from clean trays. Avoid cloudy or soft ice that melts rapidly and waters down drinks. Fill your shaker three quarters full with ice for optimal chilling without excessive dilution.
Prepare simple syrup in advance by dissolving equal parts sugar and hot water, then cooling. Store in the refrigerator for up to two weeks. Homemade syrups taste fresher and let you control sweetness precisely.
Measurement tips for consistency:
- Always use a jigger, never free pour
- Measure each ingredient separately
- Pour at eye level to check accuracy
- Prepare garnishes before mixing
- Keep backup ice ready
Pro Tip: Prep all ingredients for multiple cocktails before you start mixing. Batch squeeze citrus juice, cut garnishes, and measure spirits into small containers. This assembly line approach speeds service when guests arrive.
Visit ingredient preparation tips for advanced techniques. Learn to measure alcohol precisely to avoid common measurement errors that compromise taste.
Step 3: Mixing and Execution Order
Ingredient order matters for proper flavor integration. Start with spirits, add liqueurs and syrups, then finish with citrus juice and ice. This sequence ensures thorough mixing and prevents ingredients from separating or settling.
Shaking cocktails for 10 to 15 seconds prevents over shaking and maintains balanced flavor. Shake vigorously with both hands, creating a rhythmic motion that chills and aerates the drink. You’ll feel the shaker frost over when properly chilled. Stirred cocktails need 20 to 30 seconds of gentle circular motion to chill without creating unwanted dilution or cloudiness.
Strain immediately after mixing to capture peak flavor and temperature. Hold the strainer firmly against the shaker opening and pour smoothly into your prepared glass. Double strain through a fine mesh strainer for cocktails with muddled ingredients or citrus pulp.
Garnishes add aroma and visual appeal. Express citrus peels over the drink by twisting them to release oils, then wipe the rim and drop into the glass. Position herb sprigs where guests smell them with each sip. Keep garnishes simple and functional rather than overly decorative.
Mixing sequence:
- Add spirits to shaker first
- Pour in liqueurs and syrups second
- Add fresh citrus juice third
- Fill shaker three quarters with ice
- Shake vigorously for 10 to 15 seconds
- Strain into prepared glassware
- Add garnish and serve immediately
Explore the cocktail mixing workflow used at upscale venues. Learn to avoid cocktail mistakes by mastering proper timing and technique. Timing separates good cocktails from exceptional ones.
Common Mistakes and Troubleshooting
Common mistakes like over shaking and incorrect ice use happen in 35% of novice attempts but can be corrected with proper shaking duration and fresh ice cubes. Over shaking creates excessive dilution and changes texture from smooth to watery. Stop shaking when the shaker frosts over, typically after 10 to 15 seconds.
Wrong ice types ruin cocktails faster than most people realize. Small, soft ice melts rapidly and waters down drinks before guests finish them. Large, hard cubes from quality ice trays maintain temperature without over diluting. Never use freezer burned or cloudy ice that carries off flavors.
Measurement errors compound quickly when making multiple drinks. Eyeballing spirits leads to inconsistent strength and unbalanced flavor profiles. Always use a jigger, even when you think you’ve mastered the pour. Professional bartenders measure every drink for good reason.
Hygiene lapses introduce contamination that affects taste and safety. Unwashed tools transfer flavors between cocktails and harbor bacteria. Clean your shaker, strainer, and jigger between different drink types, especially when switching from sweet to savory profiles.
Common problems and fixes:
- Over diluted drinks: Shake less time, use larger ice cubes
- Too strong cocktails: Verify jigger measurements, don’t skip mixer
- Cloudy appearance: Stir rather than shake spirit forward drinks
- Flat taste: Use fresh ingredients, proper citrus to spirit ratio
- Warm drinks: Chill glassware, use more ice in shaker
Study troubleshooting cocktail mistakes used by professionals. Review common cocktail errors to recognize and correct them quickly. Prevention through attention to technique beats fixing problems after they occur.
Expected Outcomes and Timeline
A well made cocktail typically takes 3 to 5 minutes to prepare and receives positive feedback from at least 75% of tasters based on taste and presentation. This timeline includes workspace setup, ingredient measurement, mixing, and garnishing. With practice, you’ll reduce preparation time while maintaining quality.
Success indicators tell you when you’ve nailed the recipe. Balanced sweetness and acidity create a harmonious first sip without harsh alcohol burn. Spirit strength should be noticeable but not overpowering. Visual appeal matters too. Clear, properly chilled drinks with appropriate garnishes signal attention to detail.
Positive guest feedback confirms your progress. Listen for comments about smoothness, balance, and flavor complexity. If three out of four guests praise your cocktails, you’re hitting professional standards. Use constructive criticism to refine technique and adjust recipes to personal preferences.
| Aspect | Individual Cocktail | Batch Preparation |
|---|---|---|
| Time per drink | 3 to 5 minutes | 1 to 2 minutes |
| Freshness | Optimal | Good |
| Flavor control | Precise | Consistent |
| Best for | Small gatherings | Large parties |
Track your preparation times and guest reactions to identify improvement areas. Record successful recipes and techniques in a notebook or phone app. This practice log helps you replicate wins and avoid repeating mistakes.
Review the cocktail preparation timeline for professional benchmarks. Check cocktail success metrics to understand industry standards for quality evaluation.
Safety and Hygiene Considerations
Hygiene protects health and preserves cocktail quality throughout preparation. Wash hands thoroughly with soap before handling ingredients, especially after touching raw garnishes or ice. This simple step prevents contamination that causes illness or ruins taste.
Clean, sanitized tools eliminate cross contamination between ingredients. Wash shakers, strainers, jiggers, and spoons with hot soapy water between cocktail types. Rinse thoroughly to remove soap residue that affects flavor. Air dry on a clean towel rather than storing while damp.
Separate perishable ingredients from alcohol tools to avoid contamination. Store citrus fruits, herbs, and fresh juices in the refrigerator until needed. Never let fresh ingredients sit at room temperature for extended periods, especially during warm weather or crowded gatherings.
Safe alcohol handling prevents accidents and waste. Pour carefully to avoid spills that create slip hazards. Store bottles securely away from counter edges where they might fall. Keep caps on when not actively pouring to maintain freshness and prevent evaporation.
Clean tools and proper hygiene are non negotiable for safe, delicious cocktails. Contamination compromises both health and taste, turning impressive drinks into disappointing experiences.
Key safety practices:
- Wash hands before every preparation session
- Sanitize all tools between drink types
- Refrigerate perishable ingredients properly
- Clean up spills immediately
- Store alcohol securely when not in use
Learn about safety in cocktail making from professional venue standards. Hygiene separates home bartenders who impress from those who create health risks. Take these precautions seriously every time you mix drinks.
Alternative Methods and Tradeoffs
Batch cocktail making streamlines service for larger after work gatherings and parties. Multiply recipe ingredients by the number of guests, mix everything except ice in a large pitcher, then refrigerate until serving. Pour over fresh ice in individual glasses and add garnishes. This method saves time but sacrifices some freshness compared to individually prepared drinks.
| Factor | Individual Method | Batch Method |
|---|---|---|
| Preparation time | 3 to 5 minutes per drink | 15 to 20 minutes for 10 drinks |
| Freshness | Peak flavor and temperature | Good, slight dilution over time |
| Taste control | Precise for each drink | Consistent across batch |
| Best occasions | Intimate gatherings, 2 to 6 guests | Parties, 10 plus guests |
| Flexibility | Easy to customize per person | Limited to single recipe |
Small after work gatherings benefit from individual preparation. The extra time investment impresses guests and lets you customize drinks to personal preferences. You maintain peak freshness and temperature for each cocktail, creating memorable experiences that strengthen professional relationships.
Large parties require batch efficiency to keep guests happy without spending the entire event behind the bar. Pre mixed cocktails let you socialize while still serving quality drinks. The freshness tradeoff becomes acceptable when facing crowds of 15 or more people.
Consider guest count and priorities when choosing methods. If showcasing cocktail skills matters most, prepare individually. If mingling takes precedence over peak freshness, batch preparation makes sense. Many hosts use both approaches, batching simple cocktails while preparing signature drinks individually for interested guests.
Explore batch cocktail preparation techniques for efficient entertaining. Balance efficiency against quality based on your specific social situation and hosting goals.
Discover Expert Cocktail Experiences at The 1 Bar London
Mastering home cocktail making builds confidence, but experiencing professional artistry takes your appreciation to another level. The 1 Bar London showcases expertly crafted cocktails in a vibrant atmosphere perfect for after work socializing and special celebrations. Watch skilled bartenders execute the techniques you’re learning, gaining insights you can bring home.
Located in London’s financial district, The 1 Bar offers live music performances that create the ideal backdrop for testing your newly developed cocktail knowledge. Compare your home creations against professional standards while networking with fellow cocktail enthusiasts and local professionals.
Explore the mixology workflow used at upscale events. The 1 Bar provides private event hire options perfect for hosting your own cocktail making workshops or celebrating milestones with colleagues. Transform your cocktail skills from hobby to social centerpiece.
Frequently Asked Questions
What are the essential tools I need to start cocktail making at home?
You need six basic tools: a cocktail shaker, jigger for measuring, strainer, muddler, bar spoon, and citrus juicer. These cover all fundamental techniques without requiring expensive professional equipment. Quality base spirits, fresh citrus, simple syrup, and ice complete your starter setup for consistent results. Explore cocktail tools recommendations for specific brands and styles.
How do I set up my workspace for efficient cocktail preparation?
Clear your counter completely, then arrange tools in order of use from left to right. Keep spirits and mixers within arm’s reach, place ice in an easily accessible bucket, and organize garnishes on a small prep plate. Chill glasses in the freezer 15 minutes before mixing. This streamlined layout reduces preparation time and prevents mistakes during busy social gatherings.
Why is precise measurement so important for cocktail quality?
Accurate measurement using a jigger reduces flavor variability by up to 70% compared to free pouring. Consistent spirit amounts ensure balanced sweetness, acidity, and alcohol strength in every drink. Small measurement errors compound across ingredients, creating noticeably different results. Professional bartenders measure every cocktail for this reason, and home bartenders should follow the same practice for reliable quality.
What are the most common mistakes that ruin homemade cocktails?
Over shaking beyond 15 seconds creates excessive dilution and changes texture from smooth to watery. Using wrong ice types, especially small or soft cubes, melts rapidly and waters down drinks. Measurement errors from eyeballing spirits lead to unbalanced flavor. Poor hygiene introduces contamination affecting taste and safety. These mistakes happen in 35% of novice attempts but are easily corrected with proper technique and attention to timing.
How long should cocktail preparation take and what indicates success?
Well made cocktails take 3 to 5 minutes from start to finish, including setup, measuring, mixing, and garnishing. Success shows in balanced flavor without harsh alcohol burn, proper temperature, and clear presentation. Positive feedback from at least 75% of guests confirms quality. Track preparation times and guest reactions to identify improvement areas and refine your technique over time.